I know I promised to post the artisan bread recipe, but I woke up extra early to make linzer cookies this morn' and, by golly, I've just been so excited about them that the mess (that resulted from the baking, mixing, etcing) really didn't take the joy away from the whole experience! See, I'm speaking in run-ons. I. am. excited!
So what's so exciting about waking up at the crack o' dawn to make a batch of gluten-free linzer cookies? The dream becoming a reality, people! What dream? I've been wanting to make linzer cookies forever. Even before going gluten-free. But I just thought they were too pretty for my butterfingers. I thought I'd mess them up and disappoint Martha or Ina, whose shadows haunt me like Marley's ghost when I FAIL. (Except theirs are wearing some kind of perfectly pressed buttoned up pastel shirt with a semi-popped collar.)
But even they might give me at least a teeny-tiny grin for today's attempt. The hours of waiting, stirring, blending (that would be for the filling), jam-smothering, powder-sugar-sprinkling, and baking all paid off! Sure, some are a little ugly (I grounded them from receiving close-up camera time), but they're good. Yep, the husband approves.
One thing I should note, the filling is homemade but not truly jam-like. I made it more gluey because I didn't want to deal with a wet mess. The end result? Sandwich cookies that stuck! Yeah! No water was added to the filling, just strawberries, sugar, a little packet of knox, and a tablespoon of corn starch. Read on for the tutorial, if you wish :).
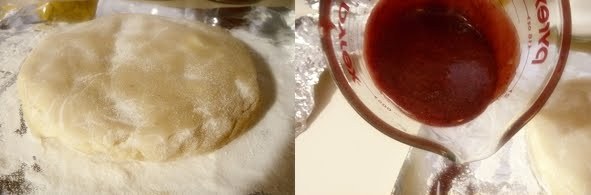
So that's how you should flatten out the dough before sticking it in the freezer, and how you should sprinkle it with white rice flour before rolling it out. (I like to use aluminum foil when rolling the dough/cutting the cookies, so I can just put the cookies right on the baking sheet without having to move them.) The red stuff is the strawberry filling, before it chilled, it's thick.
Roll out the dough nice and flat, it's a bit thick in the picture. Roll it out to slightly more than 1/4 of an inch. The dough should be easy to work with, making the cookie-cutting experience a fairly painless one :).
Be sure to use "nesting cookie cutters", as pictured on the far left. And... the next picture? What the cookies should look like when you've baked, jammed, and sprinkled them.
Roll out the dough nice and flat, it's a bit thick in the picture. Roll it out to slightly more than 1/4 of an inch. The dough should be easy to work with, making the cookie-cutting experience a fairly painless one :).
Be sure to use "nesting cookie cutters", as pictured on the far left. And... the next picture? What the cookies should look like when you've baked, jammed, and sprinkled them.
Further reading: coeliac disease guidance from the NHS.